Printing on Heavyweight Fleece
The challenges posed with this garment include the overall fabric thickness and the additional compressibility that 13-ounce fleece offers. Variables must be addressed and processes must be controlled to properly print on this fabric.
Because sweat shirts are popular when it comes to collegiate apparel, the print will be a full-front, two-color distressed graphic that also will be embellished on the left sleeve.
Garment Considerations
Sweat shirts were introduced around 1930, and the fabrics used in manufacturing these garments has evolved from cotton to cotton/synthetic blends, to strictly synthetic fabrics. Today, cotton/polyester blends are the most popular fabrics used for sweat shirts. The fabric used in the heather grey style HVF496W is a 90% cotton/10% black polyester blend.
The tightly knit fabric surface makes for a smooth and easy printing surface, regardless of whether a single-color or multicolor logo is being used. The overall fabric thickness will add compressibility to the fabric, which must be considered when printing on 13-ounce, heavyweight fleece.
When printing on such a substrate, artwork must be engineered to work well under specific printing conditions. Consider the following:
- Artwork detail
- Mesh selection
- Screen tension
- Off contact
- Ink selection
- Squeegee selection, pressure and speed
- Desired ink deposit
- Ink-transfer characteristics
- Low polyester content and the use of bleed-resistant inks
Artwork
Although variables will be engineered to suit printing on a highly compressible heavyweight fleece garment, the art should be designed to be forgiving when printing under these conditions. For this project, a distressed filter will be used with the art, providing the dual advantage of adding a nostalgic appearance to the graphic while also breaking it up and hiding minor errors that may occur during the printing process.
In this scenario — a two-color graphic being printed onto a relative light-colored background — we will simply print a high-opacity blue and black to reproduce the graphic. No underbase is required since the fabric is not dark.
As for the print location, the full-front graphic will be located 4 inches down from the collar. The left-sleeve print will be located 4 inches down from the shoulder hem.
The sleeve print’s size is only limited by the platen size you plan to use. Some collegiate apparel has stripes printed on the sleeves, an effect that can be achieved, but must be printed prior to garment assembly
Mesh Selection
When working with such a tightly knit printing surface, the ink-film thickness can be minimized. This also will help soften the print hand. For this reason, we will print through a LX 150S/48 Smart (S) mesh, which features a thinner thread diameter than standard T-thread mesh and offers a couple of different advantages:
- The thinner thread diameter allows a thinner ink film to be deposited onto the fabric surface, thus maintaining a softer print — even when printing with athletic screenprinting plastisol inks.
- Because the open-area percentage on this particular mesh is greater, you can use higher-than-usual mesh counts, thus depositing less ink and minimizing costs to achieve the finished print.
- The mesh’s increased open-area percentage also allows for faster squeegee speeds and greater production when using properly tensioned screens.
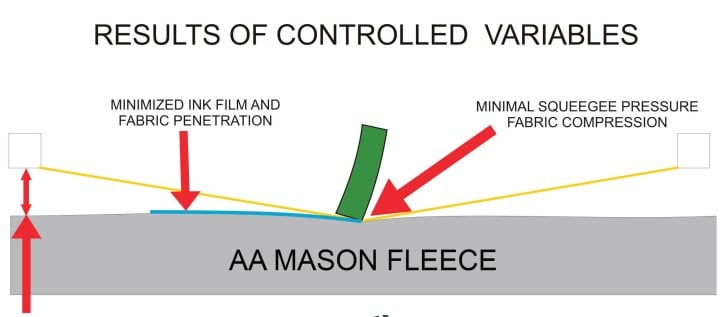
All screens were properly tensioned to the recommended 28n/cm2 . The fabric’s increased compressibility will contribute to ink being transferred onto its surface. The LX 150 S mesh’s thinner thread diameter will help minimize this effect.
Off Contact
When printing on heavyweight fleece of this nature, consider the additional fabric thickness in relation to the screen’s off contact from the fabric. When printing on standard jersey-knit T-shirt fabric, you should have an offcontact distance of between 1 ?32-inch and 1 ?16-inch to ensure proper screen snap-off from the fabric’s surface.
In this instance, considering the garment’s additional fabric thickness, off-contact distance is set at 1 ?8-inch to allow for the additional fabric thickness and the desired screen snap-off from the fabric surface, allowing for a crisp, clean print.
Squeegee Selection and Speed
For this application, the two-color graphic was printed with high-opacity, athletic plastisol inks. Because the LX 150 S mesh with a thinner thread diameter is being used, printing is done with a straight 80-durometer squeegee with a sharp edge. The goal here is to shear the desired ink-film thickness onto the fabric surface using minimal squeegee pressure.
The same effect can be achieved using a 70/90/70 triple-durometer squeegee. Because of the fabric’s compressibility, you should optimize the conditions to minimize squeegee pressure and ink-film thickness to maintain image resolution and detail.
Regarding squeegee speed — typically a non-issue — it is important to, again, remember the fabric’s compressibility. Squeegee speed should be set and applied at the optimum speed to allow for the desired ink transfer onto the fabric’s surface while keeping minimal squeegee pressure. This allows for crisp image transfer onto the fabric while minimizing the ink-film thickness. This also will contribute to a softer print hand.
Ink Selection
In this scenario, standard athletic plastisol inks were used when printing on an 90% cotton/10% black polyester heather grey garment. When printing on darker colors, where an underbase would be needed, use a bleed-resistant underbase and colors.
Remember that controlling the different variables in the screen-printing process ensures success when printing any textile. In this instance, properly controlling screen mesh, tension, off contact, and squeegee speed and pressure ensures the desired results when printing on American Apparel’s® style HVF496W.
step-by-step
-
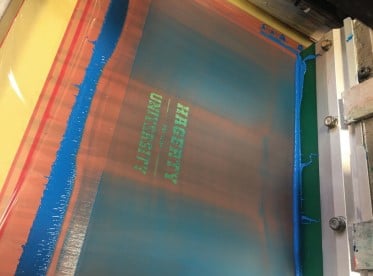
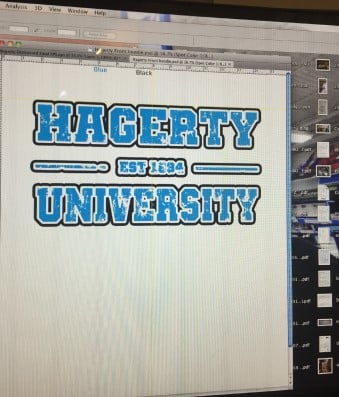 Step1 : The two-color graphic is engineered to allow for the fabric’s combressibility.
 -
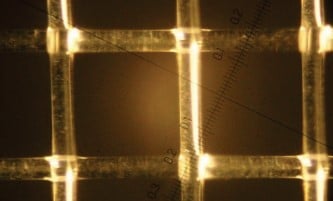 Step2 : Shown is the thinner thread diameter of the LX mesh, allowing for easier ink transfer. Photo courtesy of Murakami Screen
 -
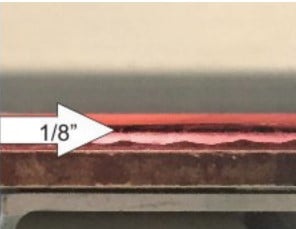 Step3 :Shown is the required 1/8-inch off contact required to print on a 13-ounce heavyweight fleece garment.
 -
 Step4 : The squeegee durometer pressure and speed are optimized to minimize the ink film transferred onto the substrate.